35 Small Kitchen Appliance Garage Ideas
Quick Answer An appliance garage for a small kitchen is a counter-level cabinet or niche with a roll-up, lift-up, or sliding door that hides toasters, mixers, and coffee makers while keeping them plugged in and ready to use. The best small-kitchen versions have an interior outlet, ventilation for heat-producing appliances, and a door that opens without blocking the work surface.
In a small kitchen, a toaster, an air fryer, a stand mixer, and a coffee maker can swallow every inch of counter you have. An appliance garage fixes that without sending your appliances to a high shelf: each one lives at counter height, stays plugged in, and disappears behind a door when you’re done. This guide covers 35 appliance garage ideas for small kitchens, grouped by door style, location, appliance, features, and budget, along with the safety rules that matter most (outlets, heat, and ventilation), a door-type comparison, and a size guide for common appliances.
Quick Takeaways
- An appliance garage works best when the appliance stays plugged in inside it, so plan an interior outlet at counter height before cabinets are ordered
- Heat-producing appliances such as toasters, toaster ovens, and air fryers need ventilation; the safest habit is to run them with the door open or pulled out
- Tambour (roll-up) doors are the classic choice, but they can stick over time; lift-up, bi-fold, pocket, and sliding doors are common alternatives
- Corner cabinets are the most popular location because a corner is otherwise hard to use
- Measure each appliance with handles, cords, and the headroom needed when lids or heads open
- Renters and DIYers can get the same effect with a ready-made countertop unit, a hardwood kit, or a cart with doors
What’s In This Guide
- What Is an Appliance Garage?
- Is an Appliance Garage Worth It in a Small Kitchen?
- Six Rules Before You Build One
- Door Types Compared
- Appliance Size Guide
- 35 Small Kitchen Appliance Garage Ideas
- Safety Rules for Heat, Power and Steam
- Cost: Custom vs Kit vs Ready-Made
- Mistakes to Avoid
- Frequently Asked Questions
What Is an Appliance Garage?
An appliance garage is a cabinet, alcove, or enclosed section of countertop designed to store small appliances out of sight while keeping them within reach. The classic version is a box at counter level with a roll-up tambour door, and the design dates back to the early 1970s. Modern versions go further: lift-up and pocket doors, built-in outlets, pull-out trays, lighting, heat-safe surfaces, and separate zones for different appliances.
The core idea is simple. A toaster that lives in a cabinet across the room gets left on the counter because carrying it is annoying. An appliance that lives at counter height, plugged in, behind a door gets used in place and put away in one motion.
Is an Appliance Garage Worth It in a Small Kitchen?
| Pros | Cons |
|---|---|
| Clears the counter for prep space | Uses cabinet space you could use for storage |
| Keeps appliances plugged in and ready | Needs an interior outlet planned in advance |
| Hides cords and visual clutter | Heat-producing appliances need ventilation |
| Appliances stay at counter height, so there’s no lifting | Tambour doors can stick or jam over time |
| Easy to wipe down inside | Large appliances like air fryers and stand mixers need more room than expected |
| Can be built into a corner that is otherwise wasted | Out of sight can mean forgotten, so keep only what you use weekly |
A good rule: if an appliance is used at least a few times a week, it earns a spot in the garage. If it’s used a few times a year, it belongs in a high cabinet.
Six Rules Before You Build One
1. Plan the outlet first. An appliance garage needs a duplex outlet inside at counter height. Adding one after the electrical is finished means opening a wall or running surface conduit, so decide during planning. Kitchen counter receptacles are generally required to be GFCI protected, so have a licensed electrician confirm the circuit and local code.
2. Plan for heat. Toasters, toaster ovens, air fryers, and microwaves need breathing room. Follow each manufacturer’s clearance guidance, and either run heat-producing appliances with the door open or pull them out on a tray.
3. Measure everything. Record the height, width, and depth of each appliance including handles, plus the cord length. Add headroom for lids or heads that tilt or lift.
4. Check door clearance. Tambour doors need space above or beside the opening for the door to roll back. Lift-up doors need overhead clearance. Pocket doors need interior side space.
5. Choose a heat-safe, wipeable interior. Stone, metal, or high-pressure laminate shelves resist heat and spills better than raw wood.
6. Keep the heaviest items low. Stand mixers, air fryers, and multicookers belong on a base-level shelf or a lift, not overhead.
💡 Pro Tip: Put a piece of painter’s tape on the counter where the garage will go and mark the door swing or roll-back. Stand in the kitchen and pretend to make toast. If the door blocks your elbow, change the style.
Door Types Compared
| Door type | How it opens | Space it needs | Best for | Watch out for |
|---|---|---|---|---|
| Tambour (roll-up) | Slats roll into a track | Room beside or above for roll-back | Classic look, small counters | Can stick over time; choose quality track |
| Lift-up | Hinges up and holds open | Overhead clearance | Tall appliances | Needs reliable hold-open hardware |
| Bi-fold | Two panels fold back | Shallow swing | Tight spaces where a track won’t fit | Hardware can intrude on the opening |
| Slides back into the cabinet sides | Interior side space | Stand mixers and larger appliances | Needs a wider cabinet | |
| Sliding | Panels glide on a track | None in front | Wall niches that keep counters full-depth | Only part of the opening is open at once |
| Hinged double doors | Swing outward | Door swing room | Budget builds, non-heat items | Doors can block an aisle |
Appliance Size Guide
These are approximate ranges. Measure your own models before ordering anything.
| Appliance | Approximate size | Planning note |
|---|---|---|
| 2-slice toaster | 11 in wide, 7 in tall | Needs ventilation; pull out or open door to use |
| Toaster oven | 16 to 20 in wide, 9 to 11 in tall | Heat-producing; needs the most clearance |
| Air fryer | 12 to 16 in wide, 12 to 15 in tall and deep | Needs more depth and rear clearance than expected |
| Stand mixer | About 14 in tall, 14 in deep | Extra headroom needed when the head tilts back |
| Drip coffee maker | About 12 to 14 in tall | Steam rises; protect the shelf above |
| Full-size blender | 15 to 18 in tall | Often too tall for a standard under-cabinet garage |
A standard wall cabinet is about 12 inches deep and the usual gap between counter and wall cabinets is about 18 inches, so many items fit, but tall blenders and big air fryers often fit better in a base cabinet.
35 Small Kitchen Appliance Garage Ideas
Door Styles (1–6)
1. Tambour Roll-Up Door
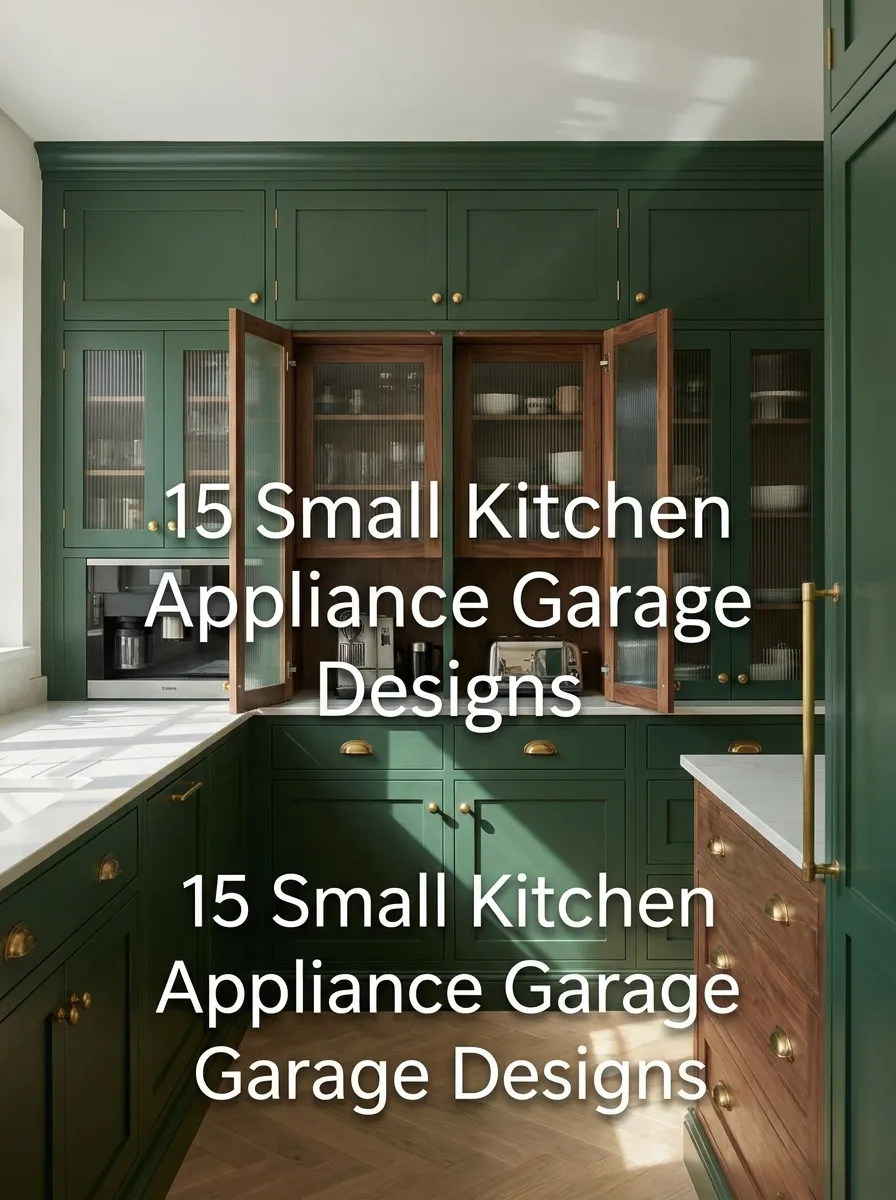
The classic. Narrow slats roll back into a track, leaving the front open and the work surface clear. It suits heat-producing appliances used in place because the door stays rolled up during use. Leave space beside or above for the roll-back, and choose quality track since cheaper ones can stick.
2. Lift-Up Door
A hinged door lifts up and stays open on a hold-open mechanism. This works well for tall items and lets you reach in without a door in your way. Make sure there’s overhead clearance and that the hardware is rated for the door’s weight.
3. Bi-Fold Door
Two panels fold back on themselves, taking up less swing than a regular door. A good choice where a tambour track won’t fit or where you want a flat-front cabinet look.
4. Pocket Doors
Doors that slide back into the sides of the cabinet leave the opening fully clear and out of the way. They’re especially good for stand mixers and other bulky appliances. Plan extra interior width for the doors to tuck into.
5. Sliding Doors on a Track
Sliding panels need no clearance in front, so they suit a recessed niche that keeps standard-depth counters. The trade-off is that only part of the opening is accessible at a time, so measure carefully.
6. Hinged Double Doors
The simplest and cheapest option, and a fine fit for non-heat appliances such as a blender. Choose soft-close hinges and make sure the doors don’t swing into a walkway.
Locations (7–14)
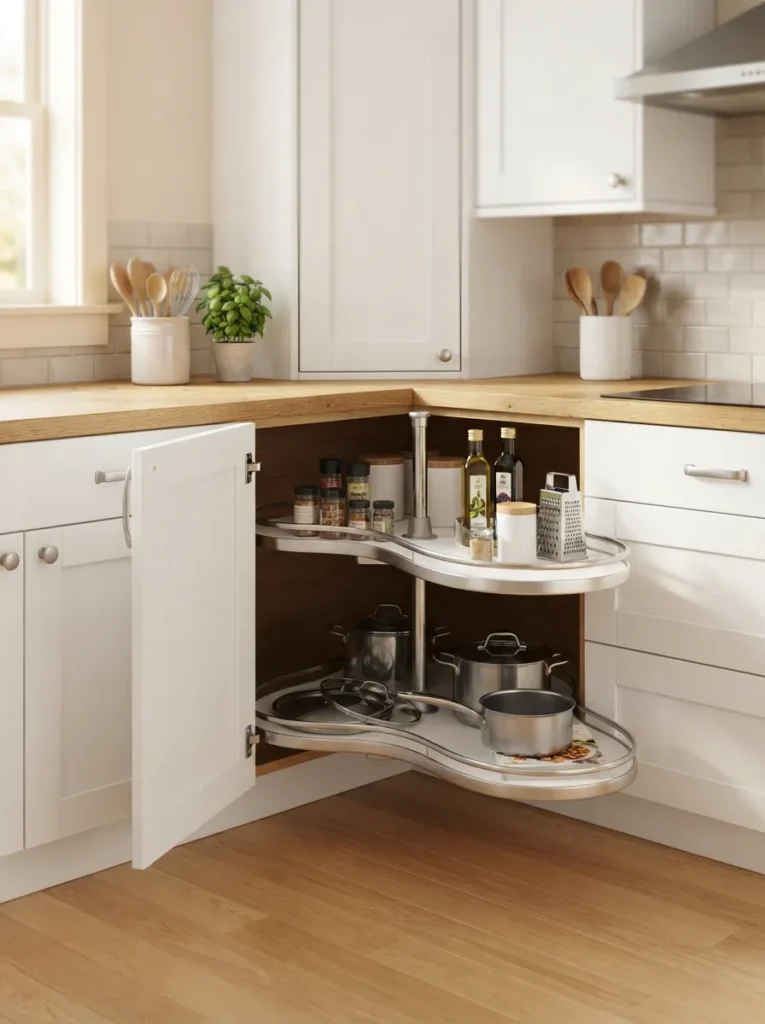
7. Corner Garage
The most common spot, because a corner is awkward to use for anything else. A corner appliance garage turns dead space into a useful storage zone. If your corners are a problem
area, see our guide to small kitchen corner cabinet solutions.
8. Under-the-Wall-Cabinet Garage
A shallow box built under the upper cabinets keeps small appliances within reach without taking cabinet space below. Confirm you have enough height between counter and cabinet for your tallest appliance.
9. Base-Cabinet Garage
A lower cabinet with a pull-out shelf keeps heavy appliances low and out of sight. It suits an air fryer or coffee machine particularly well, as long as the cabinet has enough internal height and the appliance is run with the door open or the shelf pulled out.
10. End-of-Run Garage
The last cabinet in a counter run is a natural home for a garage, since you can build it with a door on the side or front. It keeps appliances close to the prep zone without cutting into the middle of the counter.
11. Island or Peninsula Garage
Build the garage into the cook-side face of an island or peninsula so appliances are used from inside the kitchen. See our kitchen island designs for small kitchens for sizing ideas.
12. Tall Pantry Cabinet Garage
A tall cabinet with a counter-height shelf, an outlet, and doors becomes a full appliance station. It’s a good fit for a toaster oven or microwave plus a coffee maker. Pair it with our functional pantry ideas.
13. Recessed Wall Niche
A niche built between wall studs holds appliances without using counter depth. Ask a contractor to check what’s inside the wall (wiring, plumbing) and whether the wall is structural before you cut.
14. Beside-the-Fridge Garage
Place a breakfast zone beside the fridge: toaster, coffee maker, and bread within a single reach of the milk and butter. Make sure the doors don’t collide with the fridge door swing.
Garages by Appliance (15–23)
15. Toaster Drawer
A slide-out drawer stores the toaster out of sight and pulls fully out when you need it. Pull it all the way out before toasting so heat and steam have room, and add a removable crumb tray.
16. Coffee Station Garage
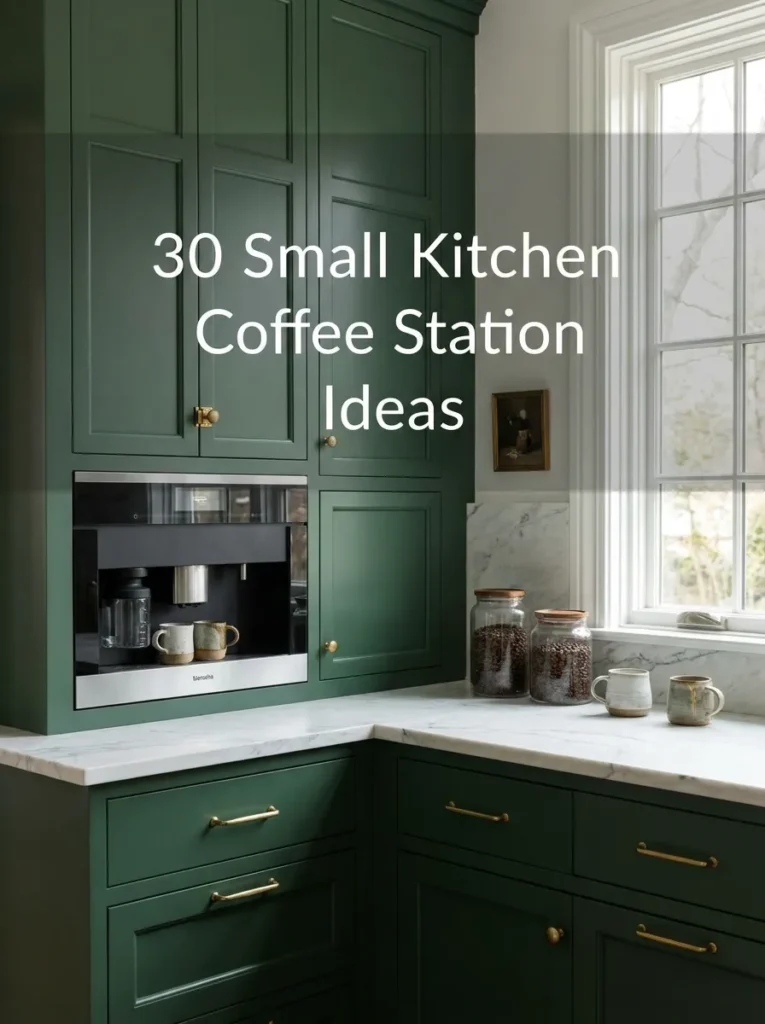
Coffee maker, canisters, and mugs in one cabinet make a morning station that disappears at night. Protect the shelf above from steam with a laminate liner, and place it near a water source.
17. Air Fryer Garage
Air fryers need more depth and clearance than most people expect. Use a pull-out shelf in a base cabinet, keep rear clearance per the manual, and run it with the door open or the shelf extended.
18. Stand Mixer Lift
A spring-up shelf lets a heavy mixer rise to counter height and drop back down when you’re done. Common home mixers weigh roughly 20 to 30 pounds, so buy hardware rated for the weight and measure the headroom needed when the head tilts back.
19. Blender and Food Processor Garage
Heavy blenders live best on a pull-out tray in a base cabinet. Measure the full jar height and store lids and blades in a small bin beside the base so the parts stay together.
20. Toaster Oven Garage
A toaster oven is the most heat-intensive appliance on this list. Use it only with the door open and manufacturer clearances respected, and line the shelf with a heat-safe surface such as stone or metal.
21. Microwave Garage
Only enclose a microwave if it’s designed for it, or run it with the door open and clearance respected. Our guide to where to place a microwave in a small kitchen covers height and ventilation rules.
22. Multicooker, Rice Cooker and Slow Cooker Garage
These heavy appliances belong on a low shelf. Pull them out to use, since the steam they release can damage the cabinet above.
23. Kettle and Tea Station
An electric kettle releases steam upward, so use it with the door open or the tray pulled out. Store tea, mugs, and honey beside it so the whole routine is in one spot.
Features That Make a Garage Work (24–31)
24. Built-In Interior Outlet
The single most useful feature. A duplex outlet inside at counter height lets appliances stay plugged in. Plug heating appliances directly into the wall outlet rather than a power strip, and have a licensed electrician confirm the circuit and code.
25. Full-Extension Slide-Out Tray
A tray on full-extension slides brings the appliance to you and lets it run outside the cabinet. Check the slide’s weight rating against your heaviest appliance.
26. Heat-Safe Liner
A stone, metal, or high-pressure laminate shelf resists heat and spills better than raw wood. It also wipes clean in seconds.
27. LED Strip Lighting
A low-heat LED strip, switched by the door or a motion sensor, makes what’s inside visible and keeps you from reaching blindly past a hot appliance.
28. Ventilated Back Panel or Gap
A vented panel or a gap at the back helps heat escape. Some designs include one specifically for air fryers. Ask your designer, and always follow the appliance manual’s clearance guidance.
29. Cord Management
Grommets, cord cutouts, or a small cord reel keep cords from being pinched by a tambour track or a closing door.
30. Divider Shelves for Flat Items
Use leftover height for a vertical divider that holds cutting boards, baking sheets, and trays. It turns dead space above a low appliance into storage. For more flat-item ideas, see our baking sheet storage ideas.
31. Wipe-Clean Interior
Crumbs, steam, and spills end up inside a garage. A laminate or sealed interior wipes clean quickly and doesn’t absorb splashes.
Budget, Renter and DIY Options (32–35)
32. Ready-Made Countertop Appliance Garage
A freestanding unit with a roll-up door sits on the counter and plugs into the wall outlet behind it. It’s renter-friendly and needs no installation. Measure the unit’s depth and height before you buy so it fits under your cabinets.
33. DIY Hardwood Tambour Kit
Hardwood kits, including corner versions, let you build an appliance garage with basic carpentry and finish it to match your cabinets. Allow extra time for fitting and sanding.
34. Rolling Cabinet or Cart With Doors
A cart with doors can sit beside the counter, store appliances out of sight, and move wherever you need it. Lock the casters and keep the cord clear of walkways.
35. Repurposed Hutch, Buffet or Bookcase
A small hutch or buffet with doors makes a charming appliance station in an open-plan or studio kitchen. Check ventilation, use appliances with the doors open, and add a heat-safe top.
Safety Rules for Heat, Power and Steam
Heat. Do not run heat-producing appliances in a closed cabinet unless the manufacturer says it’s designed for that. To avoid damaging cabinets, overheating appliances, or starting a fire, follow clearance guidance and consider ventilation.
Power. Keep the outlet within reach inside the garage, plug heating appliances directly into the wall, and avoid extension cords. Have a licensed electrician handle new circuits.
Steam. Kettles, coffee makers, and multicookers release steam that can damage cabinet interiors and the shelves above. Use a pull-out tray or open the door.
Weight. Mount heavy appliances low or on rated hardware.
Cost: Custom vs Kit vs Ready-Made
| Option | Typical budget level | Effort | Best for |
|---|---|---|---|
| Ready-made countertop unit | Low | None | Renters |
| Hardwood tambour kit | Low to medium | Moderate carpentry | DIYers |
| Cart or repurposed hutch | Low to medium | None | Studios, open-plan kitchens |
| Custom appliance garage in new cabinets | Medium to high (typically adds a few hundred dollars to over a thousand, depending on hardware and cabinet maker) | Done by cabinet maker | Remodels |
| Wall niche with outlet and doors | High | Contractor and electrician | Full remodels |
Prices vary widely by region, brand, and door hardware. Get quotes before you commit.
Mistakes to Avoid
Forgetting the outlet. An appliance garage without an outlet is a cabinet. Plan power first.
Closing the door on a running toaster or air fryer. Heat has nowhere to go. Open the door or pull the tray out.
Measuring only the base. Handles, lids, tilt-head clearance, and cords all add to the space you need.
Stuffing it with rarely used gadgets. A garage should hold what you use weekly. Everything else belongs in a high cabinet.
Choosing a door that blocks your work area. Test the roll-back or swing with tape before you build.
Frequently Asked Questions
What is an appliance garage in a kitchen?
An appliance garage is a cabinet or niche at counter level, usually with a roll-up or sliding door, that hides small appliances such as toasters, blenders, and coffee makers while keeping them plugged in and ready to use.
Do appliance garages need ventilation?
Yes, for heat-producing appliances. Toasters, toaster ovens, air fryers, and microwaves need breathing room. Follow the manufacturer’s clearance guidance, and run them with the door open or pulled out.
Can you use an air fryer in an appliance garage?
Yes, if there’s enough depth and rear clearance and you run it with the door open or the shelf pulled out. Air fryers need more room than many people expect, so measure first.
Does an appliance garage need an outlet inside?
It should. An interior outlet at counter height lets appliances stay plugged in. Plan it during rough-in, since adding one later usually means opening the wall or running conduit.
How deep should an appliance garage be?
It depends on what’s inside. A wall-cabinet depth of about 12 inches fits many toasters and coffee makers, while air fryers, toaster ovens, and stand mixers often need 15 inches or more, so a base cabinet is usually a better fit.
What is the best door for an appliance garage?
Tambour doors are the classic choice and keep the front clear, but they can stick over time. Lift-up, bi-fold, pocket, and sliding doors are common alternatives that suit different spaces.
Can I add an appliance garage to an existing kitchen?
Yes. Options include a ready-made countertop unit, a DIY hardwood kit, or a cabinet modification. Adding an interior outlet may require an electrician and wall work.
How much does an appliance garage cost?
A ready-made unit or kit is a low-cost option, while a custom garage built into new cabinets typically adds a few hundred dollars to over a thousand depending on hardware and cabinet maker. Get quotes.
Are appliance garages worth it in a small kitchen?
Usually yes, if you use the appliances a few times a week. They clear counter space and keep appliances ready, but they use cabinet space and need planning for power and ventilation.
Are appliance garages outdated?
No. They started in the early 1970s and have come back as air fryers and coffee machines took over counters. Modern versions use lift-up and pocket doors, built-in outlets, and better hardware.
Related Pages
Small Kitchen Cabinet Design
Plan built-in storage and appliance zones into your cabinets.
Small Kitchen Corner Cabinet Solutions
Turn corners into useful storage, including garage-style cabinets.
Where to Place a Microwave in a Small Kitchen
Height, clearance, and ventilation rules for microwaves.
How to Maximize Vertical Space in Small Kitchens
More ways to free up counter space.
Final Thought
The best appliance garage for a small kitchen is the one that makes your most-used appliance easier to reach and easier to put away. Start with an honest list of what you use weekly, measure each item, plan an interior outlet and ventilation, and pick a door style that doesn’t fight your work area. If you’re renting or on a budget, a ready-made unit, a kit, or a cart gets you most of the benefit. Done well, an appliance garage gives you back counter space without taking away the appliances you love.
Planning more built-in storage? Explore Small Kitchen Cabinet Design
Electrical work and clearances: follow your appliance manuals and local code, and use a licensed electrician for new outlets or circuits.
Sources
- Appliance garage design considerations: door types, interior outlets, and ventilation, from kitchen remodeling and design publications (including Houzz, Livingetc, and Bob Vila)
- Manufacturer manuals for each appliance: always follow clearance and ventilation guidance for your model
- Local electrical code and a licensed electrician for any new outlet or circuit